We ran a Solana DApp on Ethereum using Cartesi

If you’re looking to expand the user base of your DApp, I think this article is going to be helpful to you. Imagine that your Solana DApp, after a few changes, could be part of the Ethereum ecosystem. Looks good, right?
With the help of the Cartesi community, we developed a solution that enabled us to run Solana DApps on an EVM-compatible blockchain. And now we’re going to give back to the community and share all we have learned. In this article, we’ll show you how to use this solution, step-by-step. In the end, you will see one Solana DApp running outside its native blockchain.
For this tutorial, we chose the DApp Solana-Twitter, which is an app where you can write messages, just like its famous cousin.
In summary, what we’re going to do here is:
- Set up the Cartesi Rollups environment on your machine, using its Host Mode;
- Run our Cartesi DApp, and inside it, the Solana-Twitter’s back-end after some modifications;
- Modify and run Solana-Twitter’s front-end;
- Run everything again, but in Production Packed Mode.
If you’re not familiar with Cartesi or with its Cartesi Rollups, I suggest that you read their documentation in order to have a stronger background before getting your hands dirty here.
Now let’s get started!
Cartesi Rollups setup
1. Prerequisites
To ease up the development process, it is possible to run the Cartesi Rollups in Host Mode that allows you to test and debug the back-end logic using familiar tools, such as an IDE or a debugger. We will see briefly how to set it up.
But before that, you must check if your machine meets some prerequisites. The first prerequisite is having a Unix OS running on your machine. You can check this and all the other requirements on their website:
https://docs.cartesi.io/build-dapps/requirements/
2. Cartesi Rollups in Host Mode
Requirements met? If the answer is yes, you can go to the next step and download the Cartesi Rollups environment, which comes along with some example DApps. This will help you understand the basic concepts and have an idea of what is possible to build with Cartesi.
We forked Cartesi’s repository and included a new example with the name solana-adapter. It is a DApp that behaves like an adapter between the Ethereum blockchain and the Solana DApp. From now on, I'm going to refer to it as Back-end Adapter.
You can find below the commands to clone our repo and then change the branch to where the adapter is located:
git clone https://github.com/Calindra/rollups-examples.git
cd rollups-examples
git checkout feature/solana-adapter
Now we can run the Cartesi Rollups environment. Run the following commands:
cd solana-adapter
docker compose -f ../docker-compose.yml -f ./docker-compose.override.yml -f ../docker-compose-host.yml up
When you see the following log lines, it means that it is all up:
Received get_session_status with id=default_rollups_id
rollups-examples-server_manager-1 | [2022-12-29T17:25:56Z INFO host_server_manager::grpc::server_manager] received get_epoch_status with id=default_rollups_id and epoch_index=0
rollups-examples-server_manager-1 | [2022-12-29T17:25:59Z INFO host_server_manager::grpc::server_manager] received get_session_status with id=default_rollups_id
3. Run the Back-end Adapter
You need to install rust & cargo and cargo watch.
Run the following commands on new terminal:
curl https://sh.rustup.rs -sSf | sh
cargo install cargo-watch
Now we will run the Back-end Adapter on the environment we just started up. To make things more simple for you, we created a script. Just run it.
./dapp-start.shOnce again we need to look into the log. When something similar to the following lines appears, it means that the adapter is running:
warning: `solana_adapter` (lib) generated 2 warnings
 Finished dev [unoptimized + debuginfo] target(s) in 1m 05s
 Running `target/debug/solana_adapter`
Sending finish
Received finish status 200 OK
Captured rollup address: 0xf8c694fd58360de278d5ff2276b7130bfdc0192a
Sending finish
Received finish status 202 Accepted
No pending rollup request, trying again
Sending finish
Solana-Twitter’s Back-end
4. Download the DApp
Solana-Twitter is an OSS available on Github, and as the name says, it’s Twitter that writes its messages in the blockchain. Cool huh?
We forked this project and added it as a submodule to the rollups-examples repository, that you already downloaded. Now let's download the submodule's code. Go to the folder rollups-examples and run the following commands:
git submodule init solana-twitter
git submodule update solana-twitter
5. Connect the DApp to the Back-end Adapter
At this point, we have all the foundations settled to connect Solana-Twitter to the Ethereum ecosystem. In this step, we will modify Solana-Twitter ‘s contract (back-end) to enable it to communicate with our adapter. We designed the whole thing having in mind that the whole process should be as transparent as possible to the DApp, but yet some changes are necessary.
Now, open the file rollups-examples/solana-twitter/programs/solana-twitter/Cargo.toml and change its dependencies as shown in the snippet below:
[dependencies]
anchor-lang = "0.25.0"

# include Cartesi lib
cartesi-solana = "0.3.2"
With this change, you included the library cartesi-solana 0.3.2 as a dependency. Its role is similar to the Anchor framework in some aspects, and we will use it to create a new entry point to the contract. Create the file rollups-examples/solana-twitter/programs/solana-twitter/src/main.rs, with the following content:
use cartesi_solana::executor::create_executor;
use solana_twitter::entry;

pub(crate) use std::io;

fn main() -> io::Result<()> {
 let mut executor = create_executor();
 executor.get_processor_args(|program_id, accounts, data| {
 entry(&program_id, accounts, &data).unwrap();
 });
 Ok(())
}
6. Deploy Solana-Twitter’s back-end
Deploying Solana-Twitter’s back-end means that we will compile it and incorporate the binaries into our adapter. They’ll become a unique DApp running on the Cartesi Machine.
To make it easier for you to run these steps again in the future, we suggest that you create a script called rollups-examples/solana-twitter/build-cartesi-host-mode.sh containing the code below:
#!/bin/bash
set -e

cd ./programs/solana-twitter
cargo build

cd ../../
cp ./target/debug/solana-twitter ../solana-adapter/solana_smart_contract_bin/DEVemLxXHPz1tbnBbTVXtvNBHupP2RCBw1jTFN8Uz3FD
This script compiles the contract’s Rust code and then copies the generated binaries to Back-end Adapter ‘s folder.
Make it executable and run the script:
chmod +x build-cartesi-host-mode.sh
./build-cartesi-host-mode.sh
Solana-Twitter’s front-end
7. Add new app properties
In this section of the tutorial, we will focus on the front-end of the DApp. So, open the file rollups-examples/solana-twitter/app/.env, replace the value of the property, and create 3 new properties: VUE_APP_CARTESI_GRAPHQL_URL, VUE_APP_CARTESI_INSPECT_URL and VUE_APP_CONTRACT_ADDRESS. Let's see how it'll look:
# VUE_APP_CLUSTER_URL="http://127.0.0.1:8899"
VUE_APP_CLUSTER_URL="https://api.devnet.solana.com"

VUE_APP_CARTESI_GRAPHQL_URL=http://localhost:4000/graphql
VUE_APP_CARTESI_INSPECT_URL=http://localhost:5005/inspect
# address extracted from the log after running Cartesi Rollups in Host Mode with dapp-start.sh
VUE_APP_CONTRACT_ADDRESS=0xf8c694fd58360de278d5ff2276b7130bfdc0192a
Note that the value of the property VUE_APP_CONTRACT_ADDRESS must be the contract's code extracted from Cartesi Rollups, see the file deployments/localhost/dapp.address:
0xF8C694fd58360De278d5fF2276B7130Bfdc0192A8. Install libraries
Now it is time to talk about the other main component of our solution, which is the adapter for the front-end, aka Front-End Adapter. It is a NodeJS module, so you can install it via NPM. Before you run NPM, let’s add the library ethers as well, and do it all in one go. Go to the folder rollups-examples/solana-twitter/app and run:
npm i solana-cartesi-web3-adapter ethers@5.7.2Ethers will help us to connect with Metamask, which is the standard wallet for the Ethereum ecosystem.
9. Connect to Metamask
Open the file rollups-examples/solana-twitter/app/src/composables/useWorkspace.js and replace all its contents with the code below:
import { ref } from 'vue'
import { ethers } from 'ethers'
import idl from '@/idl/solana_twitter.json'
import { getWorkspace, onWalletConnected } from 'solana-cartesi-web3-adapter'

const config = {
    idl: idl,
    inspectURL: `${process.env.VUE_APP_CARTESI_INSPECT_URL}`,
    graphqlURL: `${process.env.VUE_APP_CARTESI_GRAPHQL_URL}`,
    contractAddress: `${process.env.VUE_APP_CONTRACT_ADDRESS}`,
    report: {
        maxRetry: 10,
        baseDelay: 1000,
    },
}

let workspace = null
let connected = ref(false)

export const useWallet = () => {
    return { connected }
}

export const useWorkspace = () => workspace

export const initWorkspace = () => {
    const { connection, wallet, provider, program } = getWorkspace(config)
    workspace = {
        wallet: ref(wallet),
        connection: connection,
        provider: ref(provider),
        program: ref(program),
    }
}

export async function connectMetaMaskWallet() {
    const { ethereum } = window;
    if (!ethereum) {
        alert("Get MetaMask!");
        return;
    }
    // A Web3Provider wraps a standard Web3 provider, which is
    // what MetaMask injects as window.ethereum into each page
    const provider = new ethers.providers.Web3Provider(ethereum)

    // MetaMask requires requesting permission to connect users accounts
    await provider.send("eth_requestAccounts", []);

    // The MetaMask plugin also allows signing transactions to
    // send ether and pay to change state within the blockchain.
    // For this, you need the account signer...
    const signer = provider.getSigner()
    await onWalletConnected({ ...config, signer });

    const { program, provider: providerEth, wallet, connection } = getWorkspace({ ...config, signer });
    if (!workspace) {
        workspace = {}
    }
    workspace.wallet.value = wallet;
    workspace.program.value = program;
    workspace.provider.value = providerEth;
    workspace.signer = signer;
    workspace.connection.value = connection;
    workspace.wallet.value.connected = true;
    connected.value = true;
}

async function checkMetaMaskConnected() {
    const { ethereum } = window;
    if (!ethereum) {
        return;
    }
    const accounts = await ethereum.request({ method: 'eth_accounts' });
    if (accounts.length) {
        connectMetaMaskWallet()
    } else {
        connected.value = false;
    }
    ethereum.on('accountsChanged', checkMetaMaskConnected);
}

checkMetaMaskConnected()
Then you must modify the file rollups-examples/solana-twitter/app/src/components/TheSidebar.vue replacing the contents of the script tag with:
import { connectMetaMaskWallet, useWallet } from '@/composables/useWorkspace'
const { connected } = useWallet()
In the same file, inside the template tag, replace the button <wallet-multi-button> with:
<button v-if="connected"
    class="text-white px-4 py-2 rounded-full font-semibold bg-pink-500 w-full" @click="copyAddress">
    Connected
</button>
<button v-else class="text-white px-4 py-2 rounded-full font-semibold bg-pink-500 w-full"
    @click="connectMetaMaskWallet">
    Connect MetaMask
</button>
Now edit the file app/src/components/TweetForm.vue:
// import { useWallet } from 'solana-wallets-vue' // remove this line
import { useWallet } from '@/composables/useWorkspace' // add this line
Do the same thing with the file app/src/components/TweetFormUpdate.vue .
Finally run the application, connect your Metamask wallet and see the results:
cd app
npm run serve
If you’re not familiar with connecting a Metamask wallet with a local Hardhat, read this article:
https://medium.com/@kaishinaw/connecting-metamask-with-a-local-hardhat-network-7d8cea604dc6
If everything was done correctly, you’re going to see the following screen:
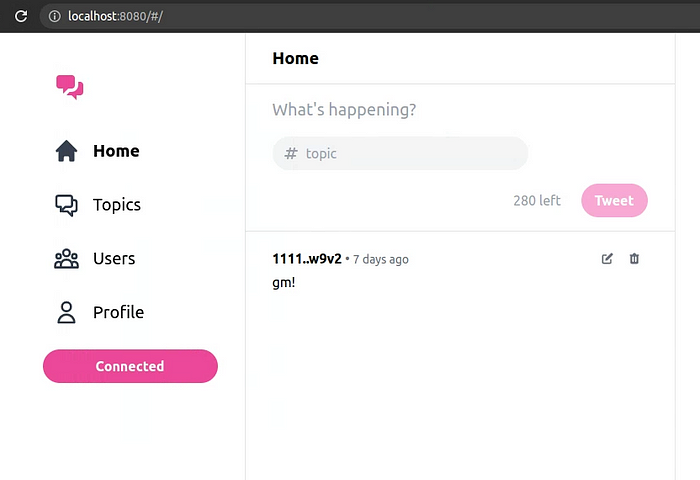
That’s it! Now you have your local-private-decentralized Twitter running on http://localhost:8080 . :D
Now let’s see how to run it in Production Packed Mode, and let the world twit with you.
Before going to the next step shutdown the environment:
docker compose -f ../docker-compose.yml -f ./docker-compose.override.yml -f ../docker-compose-host.yml down -vRunning Solana-Twitter in Cartesi Mode
At some point, you’ll want to deploy your DApp in testnet and mainnet, of course. This requires that you compile the back-end code to the Cartesi Machine’s RISC-V architecture.
It is important to remember that inside Cartesi Machine the DApp does not have internet access.
Create the script rollups-examples/solana-twitter/build-and-copy.sh with the following code:
#!/bin/bash
set -e

rm -rf ./target
cd ./programs/solana-twitter && cargo build -Z build-std=std,core,alloc,panic_abort,proc_macro --target ../../riscv64ima-cartesi-linux-gnu.json --release

cd -
cp ./target/riscv64ima-cartesi-linux-gnu/release/solana-twitter /rollups-examples/solana-adapter/solana_programs_riscv/DEVemLxXHPz1tbnBbTVXtvNBHupP2RCBw1jTFN8Uz3FD

cargo clean

echo "done."
Also give it execution permission chmod +x build-and-copy.shand create another file named rollups-examples/solana-twitter/riscv64ima-cartesi-linux-gnu.json, in the same directory. It'll contain the definitions necessary to run the script:
{
 "arch": "riscv64",
 "code-model": "medium",
 "cpu": "generic-rv64",
 "crt-static-respected": true,
 "data-layout": "e-m:e-p:64:64-i64:64-i128:128-n64-S128",
 "dynamic-linking": true,
 "env": "gnu",
 "executables": true,
 "features": "+m,+a",
 "has-rpath": true,
 "is-builtin": false,
 "llvm-abiname": "lp64",
 "llvm-target": "riscv64",
 "max-atomic-width": 64,
 "os": "linux",
 "position-independent-executables": true,
 "relro-level": "full",
 "target-family": [
 "unix"
 ],
 "linker-flavor": "gcc",
 "linker": "riscv64-cartesi-linux-gnu-gcc",
 "pre-link-args": {
 "gcc": []
 },
 "post-link-args": {
 "gcc": [
 "-Wl,--allow-multiple-definition",
 "-Wl,--start-group,-lc,-lm,-lgcc,-lstdc++,-lsupc++,--end-group"
 ]
 },
 "target-pointer-width": "64",
 "panic-strategy": "abort"
}
Fortunately, Cartesi provides a Docker image containing all the resources needed to compile the code to RISC-V.
To use that image, create another script. Name it rollups-examples/solana-twitter/build-cartesi-prod-mode.sh and paste the following code there:
#!/bin/bash
set -e

cd ../
export ROLLUPS_EXAMPLES=`pwd`
cd -
docker run \
    -v `pwd`:/workdir \
    -v $ROLLUPS_EXAMPLES:/rollups-examples \
    -w /workdir \
    --rm \
    cartesi/toolchain:0.11.0 \
    ./build-and-copy.sh
Now you’ll compile the DApp’s code. Make it executable and run the script.
chmod +x build-cartesi-prod-mode.sh
./build-cartesi-prod-mode.sh
Once it is finished, we’ll get back to rollups-examples/solana-adapter folder and compile our back-end so we can run it on RISC-V Cartesi Machine.
cd ../solana-adapter
./build-with-docker-cartesi-prod.sh
To check if everything was done correctly, we’re gonna initialize the back-end and look for the contract’s address.
./dapp-start-prod.shYou should see the same address we saw when we ran the DApp using Host Mode:
rollups-examples-hardhat-1 | eth_chainId
rollups-examples-hardhat-1 | eth_getTransactionReceipt
rollups-examples-deployer-1 | application: 0xF8C694fd58360De278d5fF2276B7130Bfdc0192A
rollups-examples-deployer-1 | writing application address to /deployments/localhost/dapp.address
Congratulations!! You have finished the tutorial.
If you want to go even further and deploy your DApp on the Testnet, follow the steps described in Cartesi’s documentation:
https://docs.cartesi.io/build-dapps/run-dapp/#deploying-dapps-to-cartesis-infrastructure
On purpose, we decided to tell you just at the end of the article that there is one Pull Request in our repository with all the changes made here. If you want to reproduce all those steps in the future again, maybe you’d use this shortcut.
That’s it guys! If you have any suggestions or just want to help us to move forward with this project, leave your comments here, or send an email to dev2dev@calindra.com.br.
Troubleshooting
We listed below some common issues you might encounter during the process.
Binaries compiled to the wrong architecture
thread 'main' panicked at 'called `Result::unwrap()` on an `Err` value: Os { code: 8, kind: Uncategorized, message: "Exec format error" }', src/lib.rs:67:67To fix this, compile the binaries for your operating system.
Hardhat’s history does not match Metamask’s account
rollups-examples-hardhat-1 | Error: VM Exception while processing transaction: reverted with reason string 'Diamond: Function does not exist'
rollups-examples-hardhat-1 | at CartesiDApp.<fallback> (contracts/CartesiDApp.sol:41)
rollups-examples-hardhat-1 | at processTicksAndRejections (node:internal/process/task_queues:96:5)
rollups-examples-hardhat-1 | at async HardhatNode.runCall (/app/node_modules/hardhat/src/internal/hardhat-network/provider/node.ts:639:20)
rollups-examples-hardhat-1 | at async EthModule._callAction (/app/node_modules/hardhat/src/internal/hardhat-network/provider/modules/eth.ts:354:9)
rollups-examples-hardhat-1 | at async HardhatNetworkProvider._sendWithLogging (/app/node_modules/hardhat/src/internal/hardhat-network/provider/provider.ts:139:22)
rollups-examples-hardhat-1 | at async HardhatNetworkProvider.request (/app/node_modules/hardhat/src/internal/hardhat-network/provider/provider.ts:116:18)
rollups-examples-hardhat-1 | at async JsonRpcHandler._handleRequest (/app/node_modules/hardhat/src/internal/hardhat-network/jsonrpc/handler.ts:188:20)
rollups-examples-hardhat-1 | at async JsonRpcHandler._handleSingleRequest (/app/node_modules/hardhat/src/internal/hardhat-network/jsonrpc/handler.ts:167:17)
Erase all the transactions history on Metamask, click on the colored ball, then Settings > Advanced, then click on the red button where it’s written ‘Reset account’ and confirm.
